If you have an iPhone, you can track it or find back your iPhone if you lost it. However, make sure the iPhone has been set up so that it is discoverable via GPS or internet and you can track and find it. Here we are going to show you the important settings that you need to know so that you can always find your iPhone if you lost it or got it stolen.
WHY SET UP YOUR IPHONE SO YOU CAN FIND IT LATER?
In case your iPhone got lost – If your iPhone got lost, the settings will help you to find and track your lost iPhone
In case your iPhone got stolen – In case, your iPhone got stolen, the settings will help your iPhone to be connected to the GPS or internet and in the same time, allows you to track and recover back your iPhone.
So, if you are interested to learn how to do this, here are the steps:-
ENABLE LOCATION SERVICES
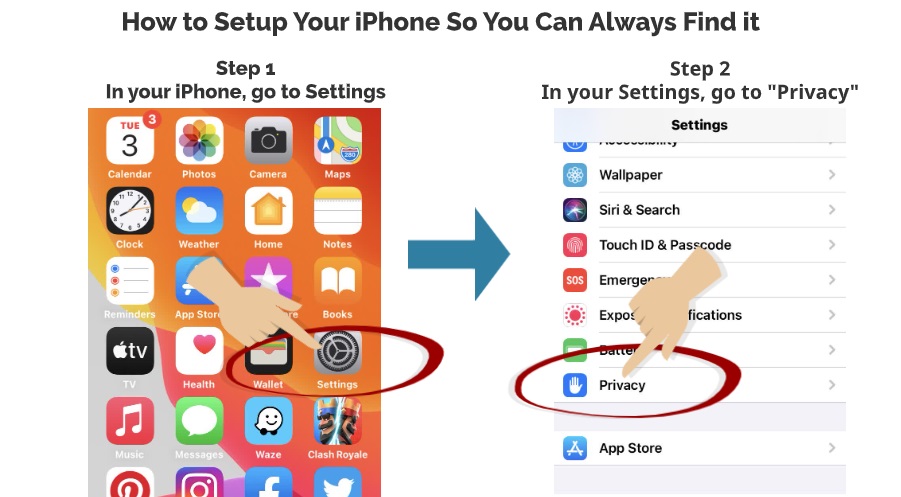
Step 1
In your iPhone, go to Settings
Step 2
In your Settings, go to “Privacy”
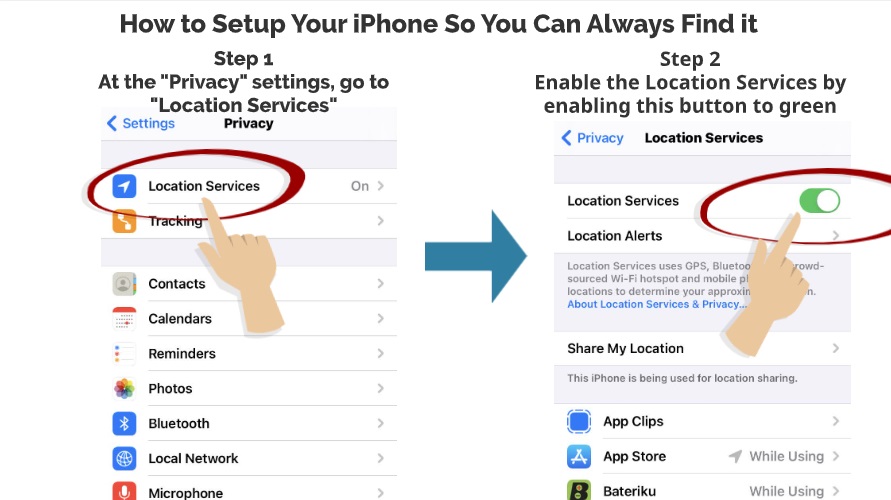
Step 3
At the “Privacy” settings, go to “Location Services”
Step 4
Enable the Location Services by enabling this button to green
ENABLE FIND MY IPHONE
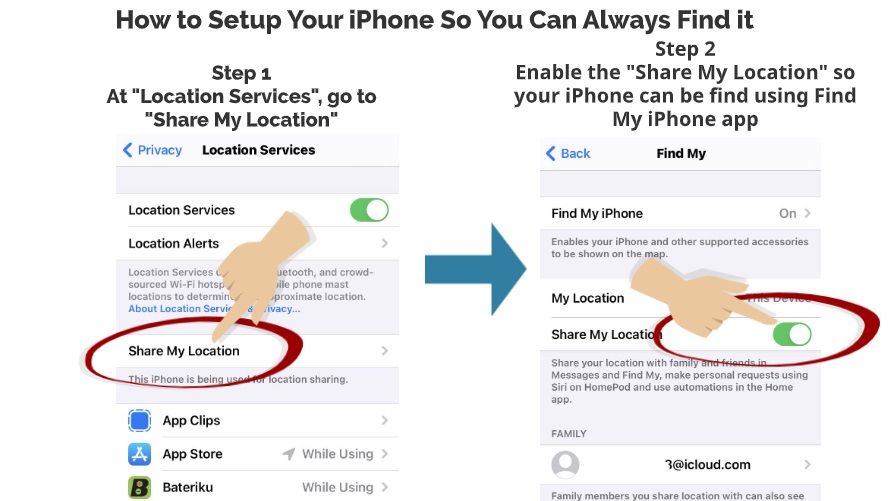
Step 1
At “Location Service”, go to “Share My Location”
Step 2
Enable the “Share My Location” so your iPhone can be found using Find My iPhone app
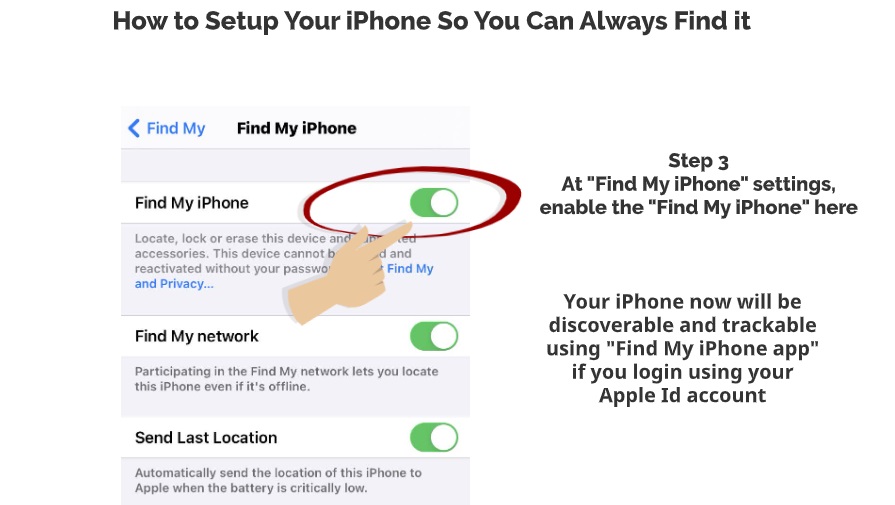
Step 3
At “Find My iPhone” settings, enable the “Find My iPhone” here
Your iPhone now will be discoverable and trackable using “Find My iPhone” app if you log in using your Apple ID account
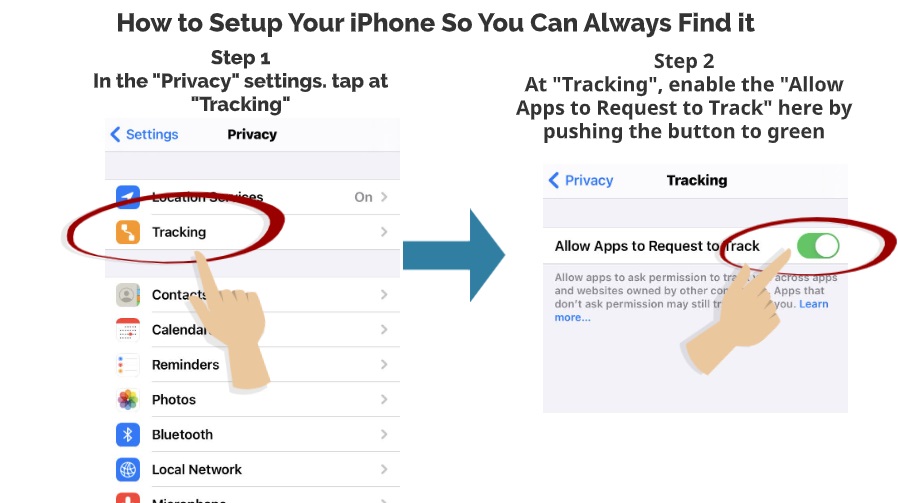
ENABLE “ALLOW APPS TO REQUEST TO TRACK”
Step 1
In the “Privacy “ settings, tap at “Tracking”
Step 2
At “Tracking”, enable the “Allow Apps to Request to Track” here by pushing the button to green.
So, there you have it- Simple iPhone settings that you need to know to enable your iPhone to be discoverable and trackable in the future. Please leave us a comment below on what other apps that you use to find the location of your iPhone.
If you do not want your iPhone to be tracked, you need to know which location settings in your iPhone that needs to be turned off. Some settings completely blocked any location data from transmitting from your iPhone and there are some settings that only partially limit the location tracking of your iPhone. Here we are going to show you the top 7 location settings that are in your iPhone and the steps on how to turn it off.
If you are interested to know how, here are the steps.
#1 TURN OFF LOCATION SERVICES
Location Services is the GPS services provided on your iPhone. This allows all the features that require a GPS location to be active if you have enabled the location services in the settings. You can disable the location services if you do not want your iPhone to be tracked via the GPS.
Here are the steps.
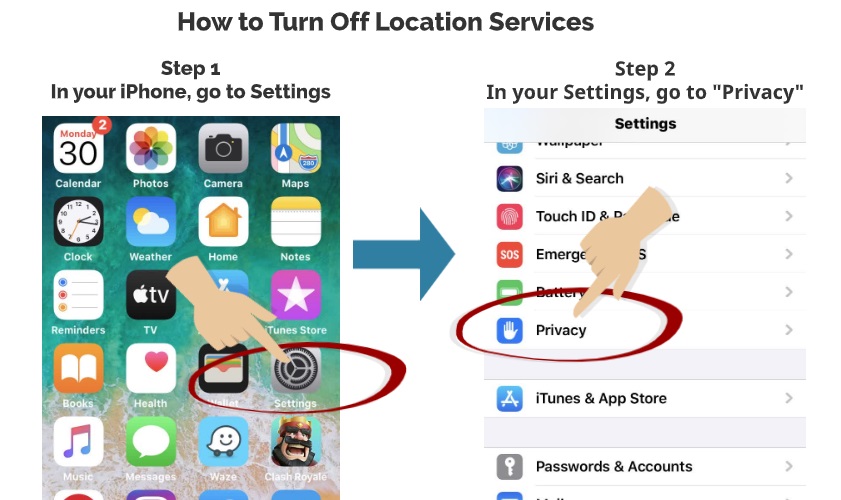
Step 1
In your iPhone, go to Settings
Step 2
In your Settings, go to “Privacy”
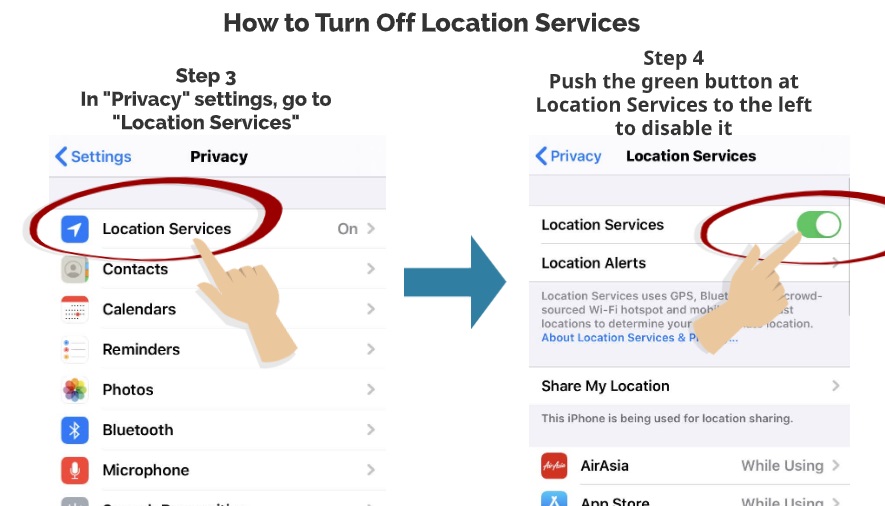
Step 3
In “Privacy” settings, go to “Location Services”
Step 4
Push the green button at Location Services to the left to disable it
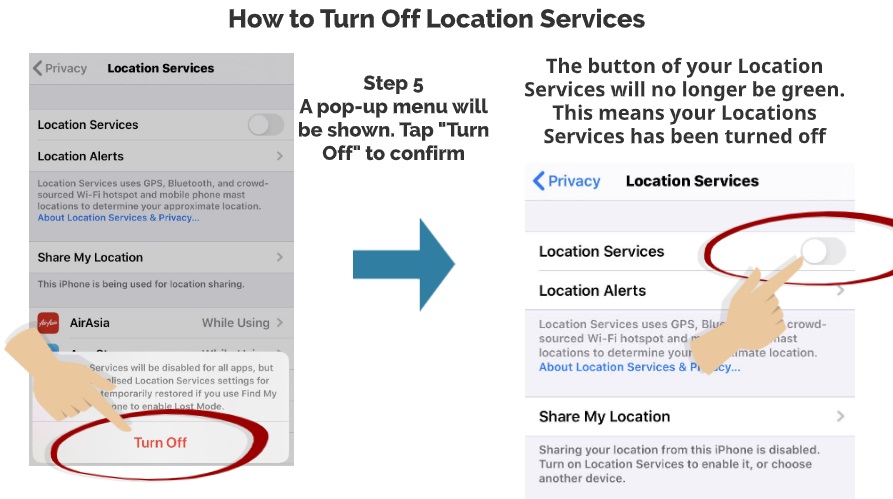
Step 5
A pop-up menu will be shown. Tap “Turn Off” to confirm
The button of your Location Services will no longer be green. This means your Locations Services has been turned off
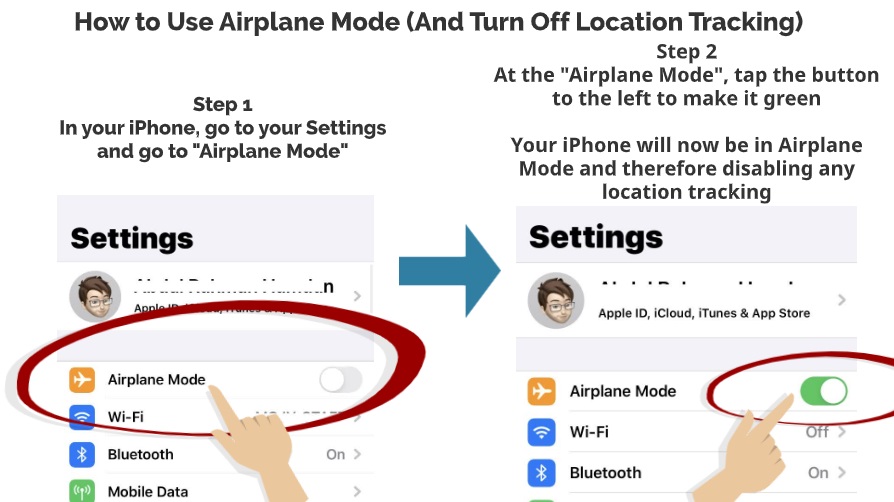
#2 USE AIRPLANE MODE
Airplane mode is a quick feature where it will allow your iPhone to disconnect not just your location services, but as well as your internet connection. This will limit the ability of your iPhone to be tracked.
Here are the steps.
Step 1
In your iPhone, go to your Settings and go to “Airplane Mode”
Step 2
At the “Airplane Mode”. Tap the button to the left to make it green
Your iPhone will now be in Airplane Mode and therefore disabling any location tracking
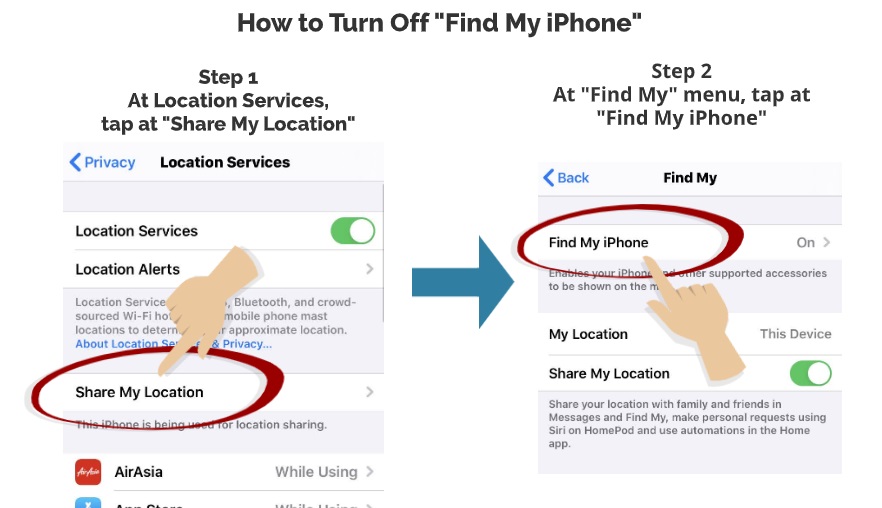
#3 TURN OFF “FIND MY IPHONE”
The “Find My iPhone” feature is one of the most important features to be used if you have lost your iPhone. However, if you do not want your iPhone to be tracked even If you have lost it, here are the steps on how you can disable this function.
Step 1
At the Location Services, tap at “Share My Location”
Step 2
At “Find My” menu, tap at “Find My iPhone”
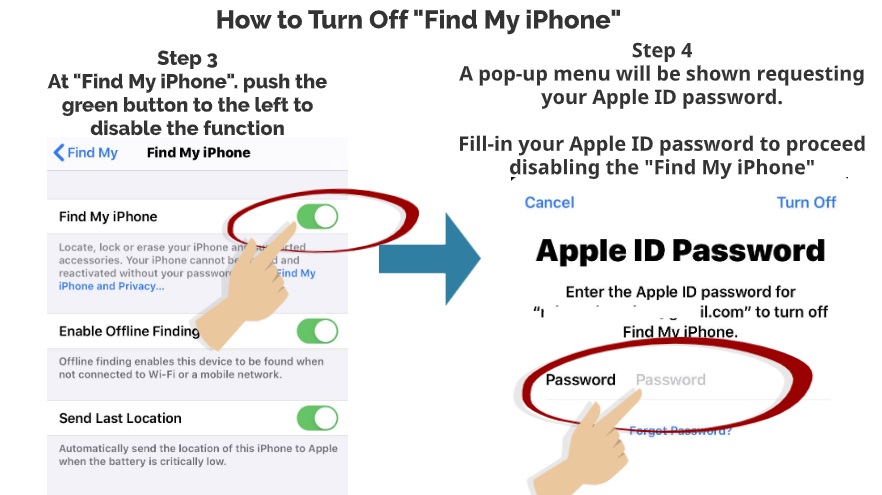
Step 3
At “Find My iPhone”, push the green button to the left to disable the function
Step 4
A pop-up menu will be shown requesting your Apple ID password
Fill in your Apple ID password to proceed to disable the “Find My iPhone”
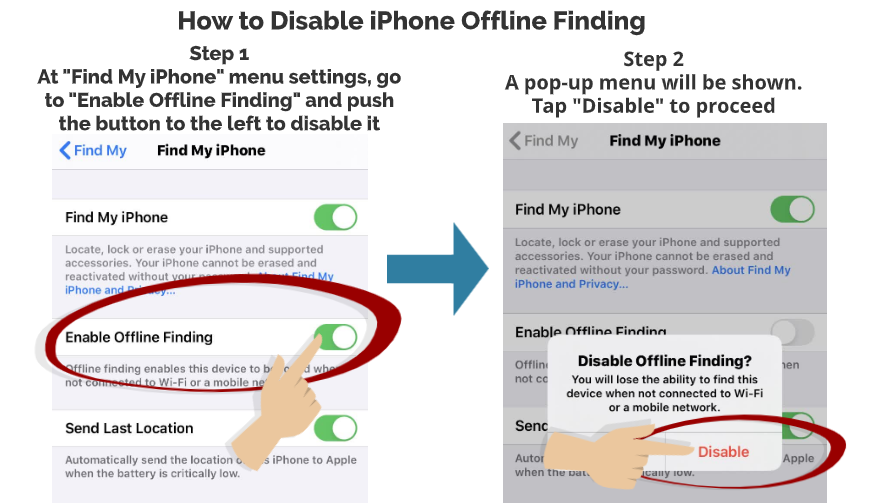
#4 DISABLE IPHONE OFFLINE FINDING
Even if your iPhone is not connected to the internet, your iPhone can still be tracked via the Bluetooth connection.
Here are the steps on how you can disable this Bluetooth location tracking feature.
Step 1
At “Find My iPhone” menu settings, go to “Enable Offline Finding” and push the button to the left to disable it
Step 2
A pop-up menu will be shown. Tap “Disable” to proceed
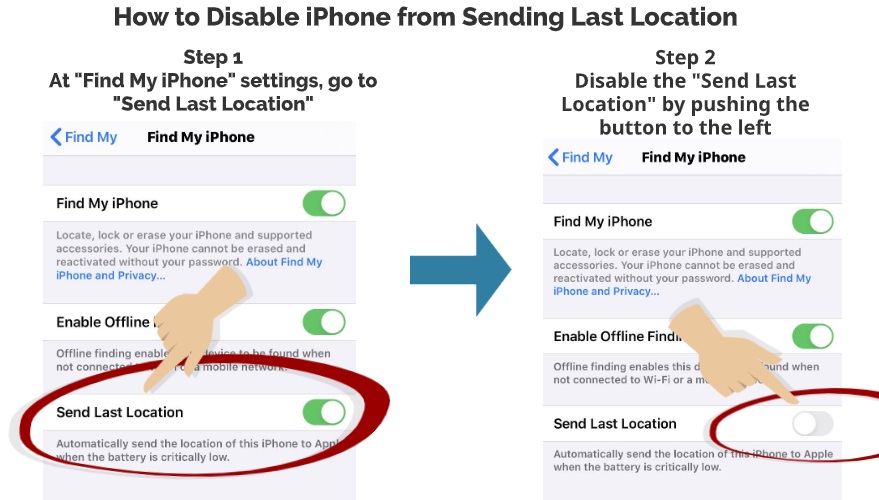
#5 DISABLE IPHONE FROM SENDING LAST LOCATION
Your iPhone can no longer be tracked once it is turned off or not connected to the internet. However, it can still show the last time it was discoverable via the internet.
Here are the steps on how to limit your iPhone from sending its last location.
Step 1
At “Find My iPhone” settings, go to “Send Last Location”
Step 2
Disable the “Send Last Location” by pushing the button to the left
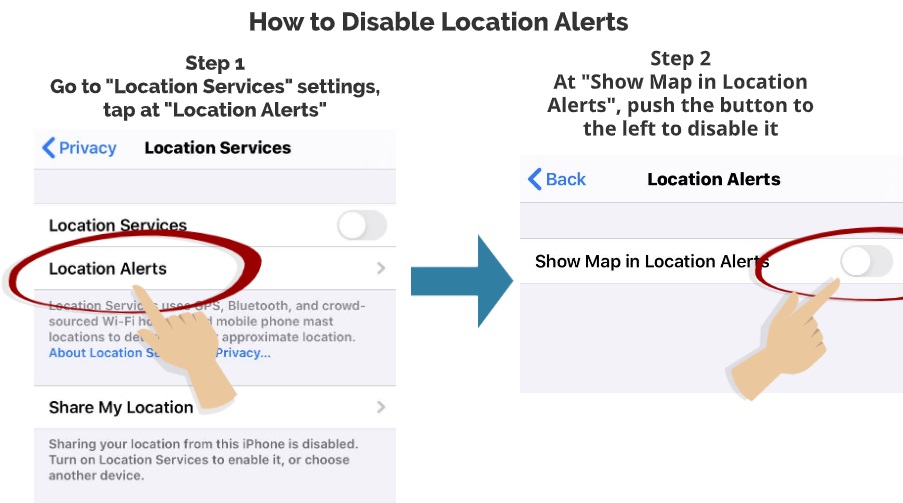
#6 DISABLE LOCATION ALERTS
Your iPhone can also send location alerts where it will show your iPhone location in a map.
Here is how to disable this.
Step 1
Go to “Location Services” settings, tap at “Location Alerts”
Step 2
At “Show Map in Location Alerts”, push the button to the left to disable it
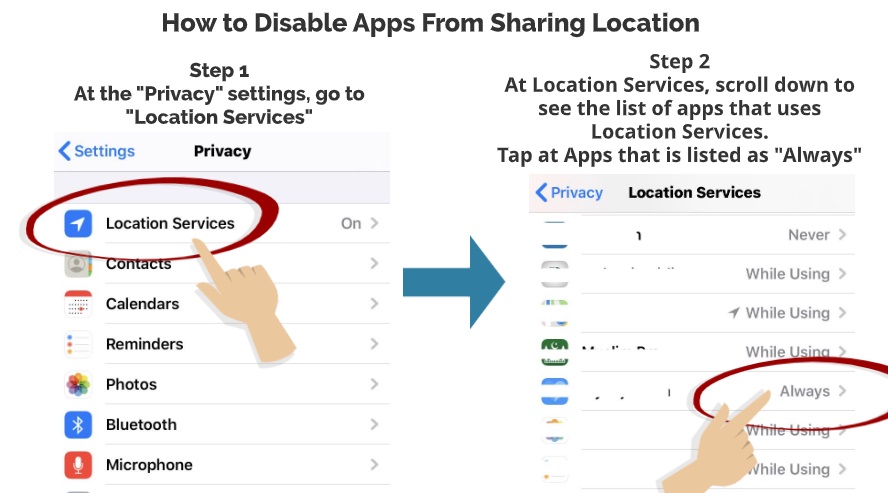
#7 DISABLE APPS FROM SHARING LOCATION
If you do not want to block your iPhone from location sharing, you can also just select which specific apps in your iPhone that be blocked from sharing your iPhone’s location.
Here are the steps.
Step 1
At the “Privacy” settings, go to “Location Services”
Step 2
At Location Services, scroll down to see the list of apps that uses Location Services.
Tap at Apps that are listed as “Always”
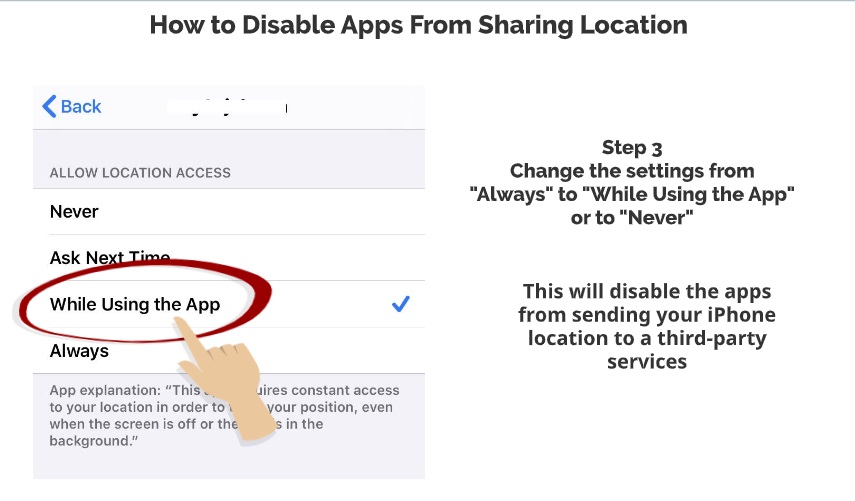
Step 3
Change the settings from “Always” to “While Using the App” or to “Never”
This will disable the apps from sending your iPhone location to a third-party services
So, there you have it – Top seven iPhone location settings and how you can disable or turn it off. Please leave us a comment below on what are the most common location settings that you would normally use.
Your iPhone is a very powerful tracking device due to the embedded GPS chip in your iPhone. Coupled with the applications that are installed in your iPhone, many added-value functions are created to fully utilize the iPhone’s ability for location sharing. Due to that factor, there are now many ways on how you can share your location using the iPhone and the apps.
WHY SHARE LOCATION?
There are many reasons why you should be sharing your
iPhone’s location. Here are some of the top reasons.
LET
FAMILY MEMBERS KNOW YOUR WHEREABOUTS – By sharing your location, your
family members would know where you are and in case of emergency, they could
immediately know where to find you
ARRANGING
MEETUP – If you are arranging a meetup in somewhere unfamiliar to your
friends or families, the best way is to let people know where you are by
sharing your location. This way they can use the GPS app to meet where you are
located
SHARING
TRAVELLING INFO – Another reason to share a particular location using the
iPhone is for other people’s reference when they visiting the location. This
would come in handy if you are travelling someplace that you are not familiar
with.
Here in this article, we are going to show you the top five ways how you can share your location using the iPhone to any of your family members and friends.
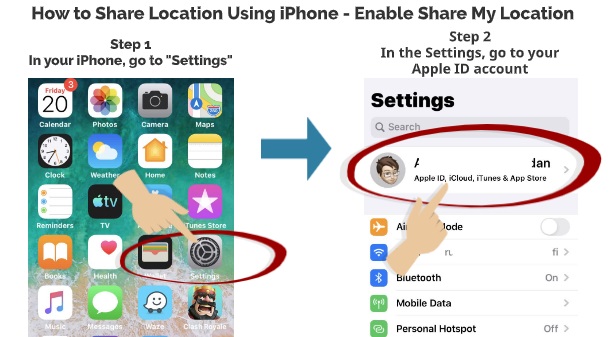
HOW TO ENABLE “SHARE MY LOCATION” USING IPHONE
Step 1
In your iPhone, go to “Settings”
Step 2
In the Settings, go to your Apple ID account
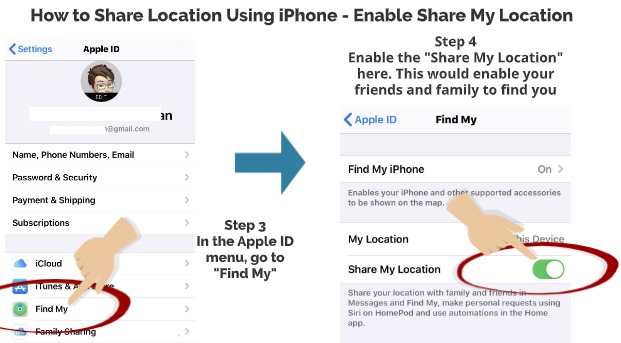
Step 3
In the Apple ID menu, go to “Find My”
Step 4
Enable the “Share My Location” there. This would enable your friends and family to find you using Apple devices
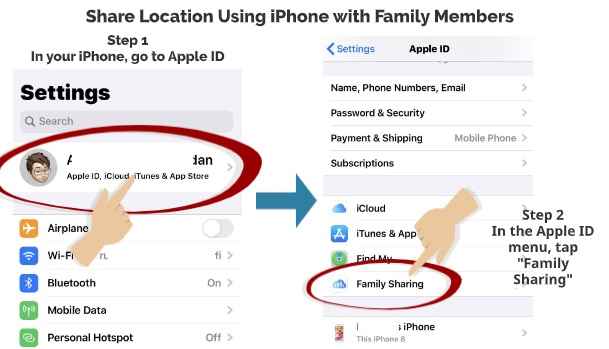
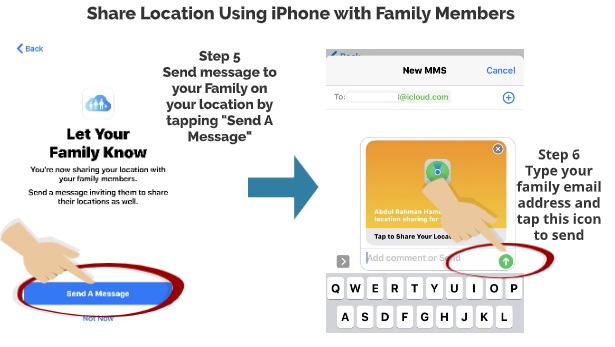
SHARE LOCATION USING IPHONE WITH FAMILY MEMBERS
Step 1
In your iPhone, go to Apple ID
Step 2
In the Apple ID menu, tap “Family Sharing”
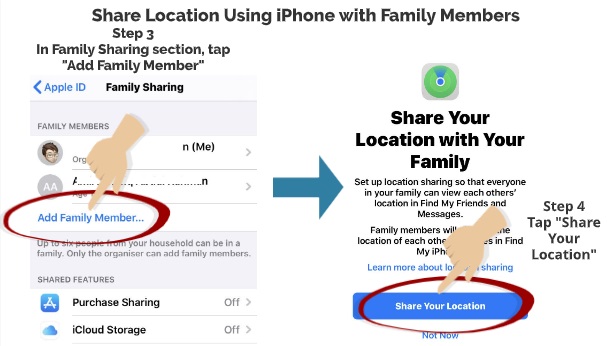
Step 3
In the Family Sharing section, tap “Add Family Member”
Step 4
Tap “Share Your Location”
Step 5
Send a message to your family on your location by tapping
“Send A Message” button below
Step 6
Type your family email address and tap the send button to send the email
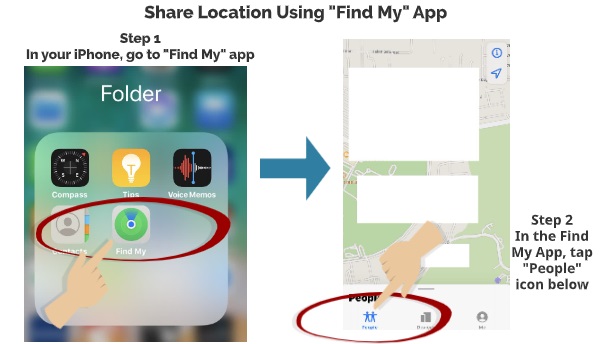
SHARE IPHONE LOCATION USING “FIND MY” APP
Step 1
In your iPhone, go to “Find My” app
Step 2
In the Find My app, tap the “People” icon below
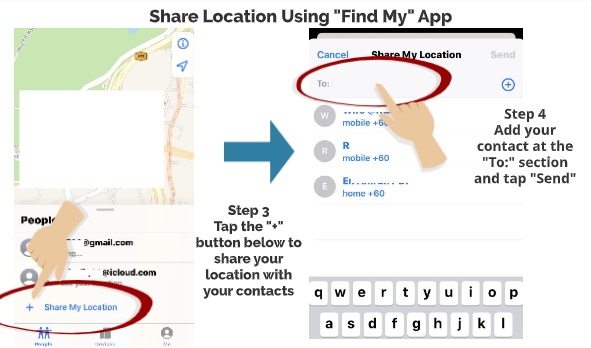
Step 3
Tap the “+” button below to share your location with your
contacts
Step 4
Add your contact the “To:” section and tap “Send”
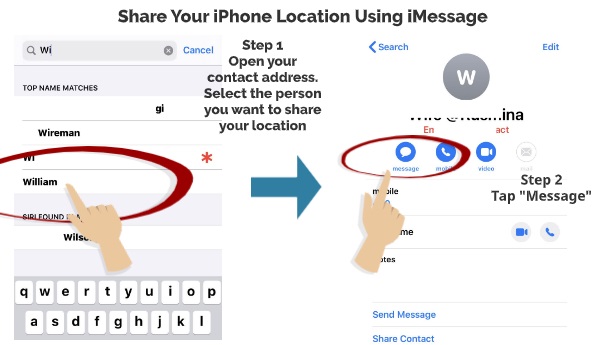
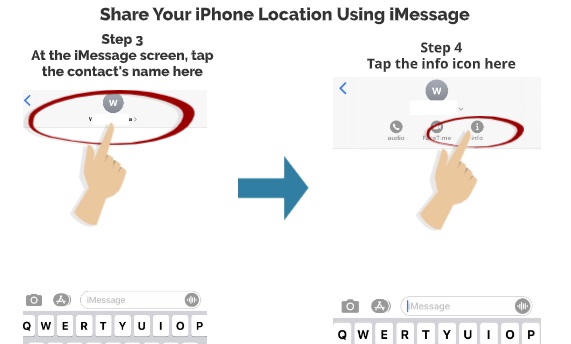
SHARE YOUR IPHONE LOCATION USING IMESSAGE
Step 1
Open your contact address. Select the person you want to
share your location with
Step 2
Under the contact’s name, tap “Message”
Step 3
At the iMessage screen, tap the contact’s name there
Step 4
Tap the info icon there
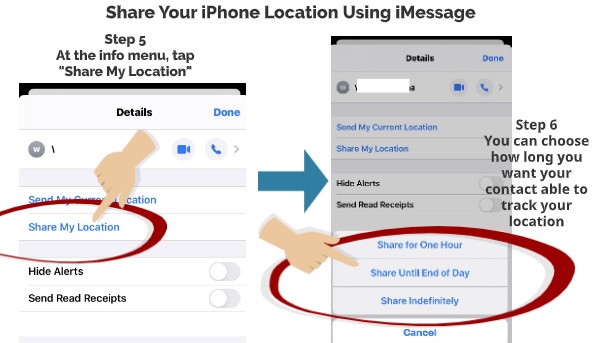
Step 5
At the info menu, tap “Share My Location”
Step 6
You can choose how long you want your contact to be able to
track your location.
You have the option to choose to share for “One Hour”, “Until End of Day” or “Indefinitely”
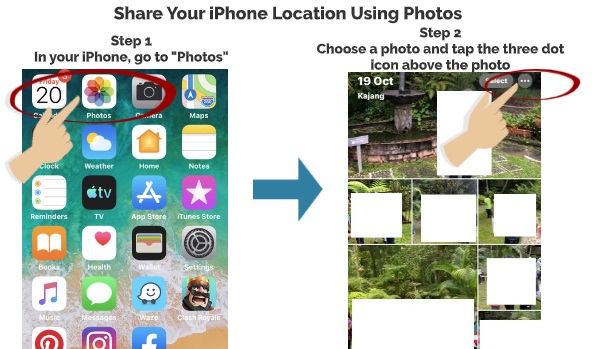
SHARE YOUR IPHONE LOCATION USING PHOTOS
Step 1
In your iPhone, go to “Photos”
Step 2
In your photo album, choose a photo and tap the three-dot icon above the photo
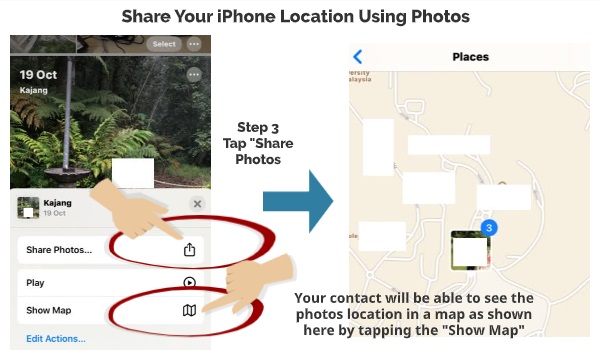
Step 3
Tap “Share Photos”
Your contact will be able to see the photo’s location in a map by tapping the “Show Map” in their iPhone or Apple devices
So, there you have it – top 5 ways how you can share your
location using your iPhone with your family members and friends. Please leave
us a comment below on which option that you prefer to share your location with
your contacts.

 Follow